![]()
Managing eSync Security Certificates
Ektron CMS400.NET’s eSync feature uses security certificates to ensure secure communication between servers. That is, all servers in an eSync configuration must have matching, encrypted security certificates in order to establish an eSync relationship.
Note: If your configuration features separate database servers, you do not need to install security certificates on them. You only need to install certificates on servers that host Ektron CMS400.NET.
See Also: Create eSync Security Certificates for a Load Balanced Cluster
The Client and Server Certificates
Before you can establish an eSync relationship between servers, each server must have its own (local) security certificate and one from every other server in the configuration, as shown below.
-
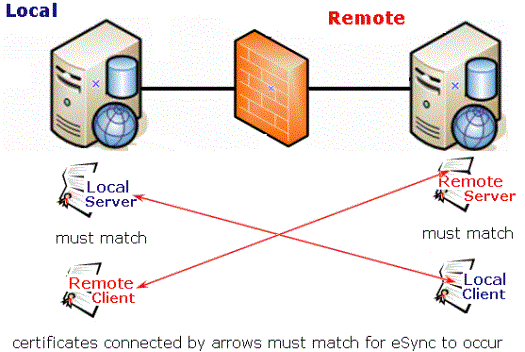
As another example, if an eSync configuration consists of five servers, each server would require five security certificates: one local and four remote certificates.
Each server creates two sets of certificates: a server and a client set. Then, you copy the certificates to the other server. The local machine’s server certificate must match a client certificate on the remote server, and vice versa.
Certificates are typically copied only when you first establish an eSync relationship between servers. After that, any eSync activity triggers a background check, and the user can proceed only if the certificates match.
Each certificate consists of the following files.
Server certificate
- servername_SyncServer.pfx
- servername_SyncServer.pvk
- servername_SyncServer.cer
Client certificate
- servername_SyncClient.pfx
- servername_SyncClient.pvk
- servername_SyncClient.cer
The security certificates can apply to one site or all sites on a server. You determine this when installing them.
See Also: Installing Security Certificates
Installing Security Certificates
Prerequisite: Permission to copy and paste files between local and remote servers
To create and place eSync security certificates in the correct locations, follow these steps.
Step 1: Create Security Certificates on Your Local Server
Step 2: Create Security Certificates on the Remote Server
Step 3: Copy Local Client Certificate to Remote Server
Step 4: Copy Remote Client Certificate to Local Server
Step 5: Test the Security Certificates
Step 1: Create Security Certificates on Your Local Server
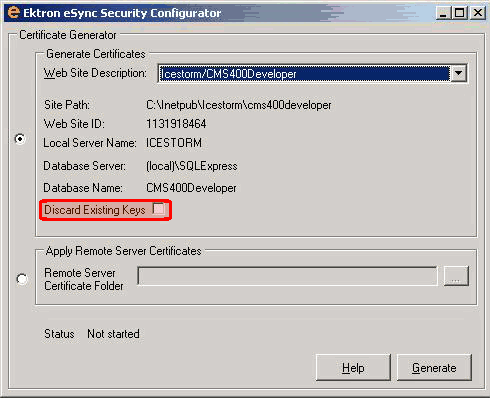
1. At the end of the Ektron CMS400.NET installation, you are asked if you want to install eSync security certificates. If you agree, the following screen prompts you to enter information needed to create the certificates.
Note: You can access this screen at any time screen by opening Windows Start Button> All programs > Ektron > CMS400 v8x > Utilities > Security Configurator.
-
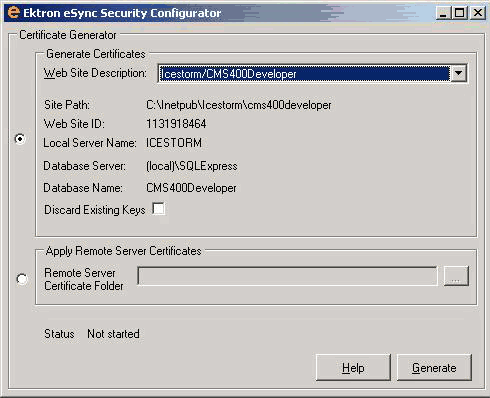
Use the following table to complete this screen.
|
Field |
Description |
|
Generate Certificates - Use this screen area to create security certificates that must be copied to a remote server with which you want to sync. |
|
|
Web Site Description |
If more than one site is set up on this server, use the pull-down list to select the Web site for which you are installing security certificates. Or, click All to apply the certificates to all sites on this server. |
|
Apply Remote Server Certificates - Use this screen area to apply eSync security certificates that were copied from a remote server to your local server. See Also: Step 3: Copy Local Client Certificate to Remote Server |
|
2. Click Generate.
3. Local security certificates are created and configured (illustrated below).
See Illustration

Note: Only click OK once. The status field at the bottom of the screen updates the status as it progresses. If you click OK more than once, you delay the certificates’ creation.
Step 2: Create Security Certificates on the Remote Server
1. Sign on to remote server.
2. Generate security certificates for the remote server, following instructions in Step 1: Create Security Certificates on Your Local Server.
3. When you complete this procedure, remote client and server security certificates are created and configured (illustrated below).
See Illustration

Step 3: Copy Local Client Certificate to Remote Server

1. On the local server, open two Windows Explorer windows: one showing the local server’s file system, and the other showing the remote server’s file system.
2. In the remote server window, create a folder underneath the root folder. The folder name is not important.
Warning! Do not place it under the web root folder, C:\inetpub\wwwroot.
3. In the local server window, open the following folder: C:\ProgramFiles\Ektron\CMS400V7x\Utilities\Software\SecurityConfigurator.
4. Copy the following files.
servername_SyncClient.pfx
servername_SyncClient.pvk
servername_SyncClient.cer
servername_SyncServer.pfx
servername_SyncServer.pvk
servername_SyncServer.cer
Note: These files were created when you completed the eSync Security Configurator Screen in Step 1.
5. Paste the files into the remote server folder that you created in Step 2. Make sure there are no other security files in the folder.
After the local server’s security certificates are copied to the remote server, you need to register and move them to the correct folders. The Security Configurator screen does this.
6. On the remote server, open the security configurator screen using this path: Windows Start Button > All programs > Ektron > CMS400 v8x > Utilities > Security Configurator.
7. The security configurator screen appears.
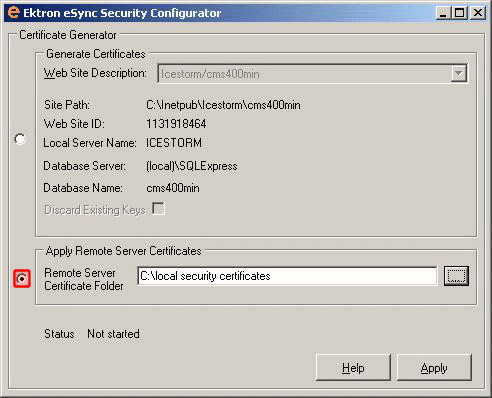
8. Click Apply Remote Server Certificates (circled above).
9. Click the browse button next to that field.
10. Browse to the folder to which you pasted the security certificates in Step 5.
11. Click Apply.
12. The utility copies the security certificates you pasted in Step 5 to the correct folder, and configures them for the remote server.
Step 4: Copy Remote Client Certificate to Local Server
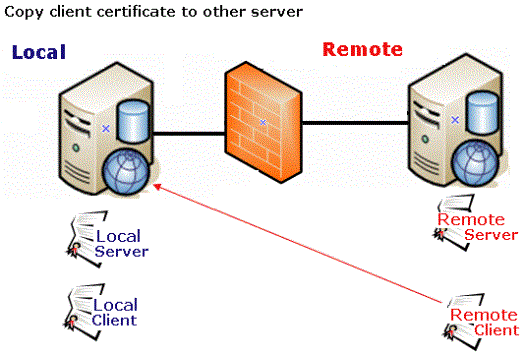
1. Sign on to the remote server.
2. Follow the steps described in Step 3: Copy Local Client Certificate to Remote Server, except substitute remote for local.
Step 5: Test the Security Certificates
1. From the local server, sign on to Ektron CMS400.NET.
2. In the Workarea, go to Settings > Configuration > Synchronization.
3. Click plus ( ).
).
4. Insert the name of the Remote Server.
5. Select the security certificate you are testing.
6. Click Connect.
7. If the next screen appears, the security certificates are working properly.
Regenerating Security Certificates
Follow these steps to regenerate security certificates. You may need to do this if they stop working, or you are concerned about a security breach.
1. Access the eSync Security Configurator screen via Windows Start Button > All programs > Ektron > CMS400 v8x > Utilities > Security Configurator.
2. Use the Web Site pulldown field to select a site on your server, or choose All sites.
3. Click the Discard Existing Keys checkbox (circled below).
4. Click Generate.
5. The existing security certificates are removed from your local server.
6. Reopen the Security Configurator screen.
7. Choose the correct Web Site, verify the other settings, and click Generate. See Also: Step 1: Create Security Certificates on Your Local Server
8. This action generates new security certificates on your server.
9. Copy the new certificates to all other servers in the eSync configuration. This is explained in Step 3: Copy Local Client Certificate to Remote Server.
Troubleshooting Security Certificates
Could Not Connect Error
When trying to connect to a remote server, after selecting a security certificate, you may see the following message.
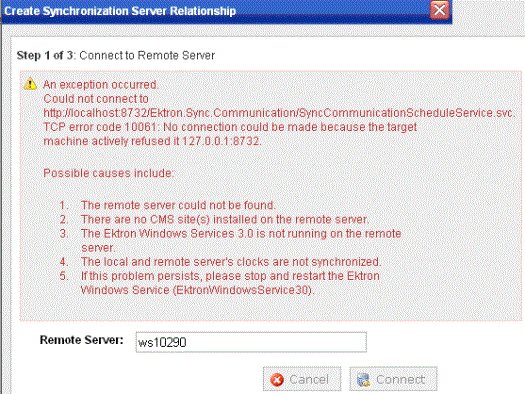
Here are some steps to resolve the problem.
Check the Windows Event Viewer > EktronL2 log for the error. If the service is hosted but already exists, stop then start the service (do not restart).
The certificates may be corrupted. To resolve this, see Regenerating Security Certificates.
No Endpoint Error
-
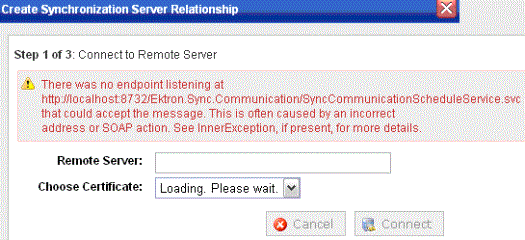
The above error indicates that
the remote site may not be on the same Ektron CMS400.NET version as the local site, or
the Ektron Windows Service is not started


![]()